|
Sorry for the delay....the power has been out again so no computer or
welding/grinding. Very frustrating.
Congratulations on your test Jim. It sounds like you're making great
progress !
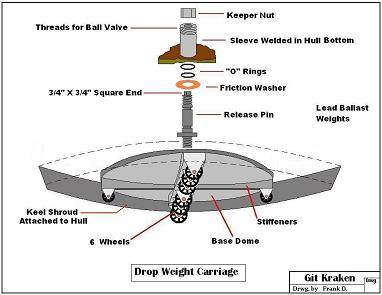
I too have been making my drop weight assembly.
I had originally planned on just a hydraulic release catch, but
have changed it to a threaded pin as a fail-safe.
The pin has a 3/4" square on the upper end which is accessed by opening a
2" ball valve in the hull bottom.
By opening the ball valve and inserting a square socket over the square
ended pin, I can rotate the pin so it "unthreads" from the nut on the drop
weight pan. The pin stays in the sleeve, and the pan drops off.
The pan is actually the round disk I cut out from the hull for
the hatch. It's curvature matches the hull bottom exactly so the release
pin acts like a big bolt pulling the pan up tight to the hull bottom.
The pan is also the base for the rollers on the sub. I have put 6 steel
wheels rated at 1500 lbs. each in a row on the bottom of the pan, to act like a
large roller so the sub can be rolled or spun while on the shop floor.
The two smaller wheels in front and behind the main roller wheels will
steer the sub straight if either one is touching the floor. Because these two
wheels are slightly smaller, the sub will "teeter" on the main rollers.
I will be adding a 1/4" steel shroud to the hull bottom so any contact with
rocks or sea weed will not hit the drop weight pan/wheel assembly.
Here's a little sketch.
The 4 lead weights ( not shown ) will be triangular blocks bolted to the
steel pan.
For this assembly to work properly the sub will need to be balanced at the
center point.
Frank D.
|